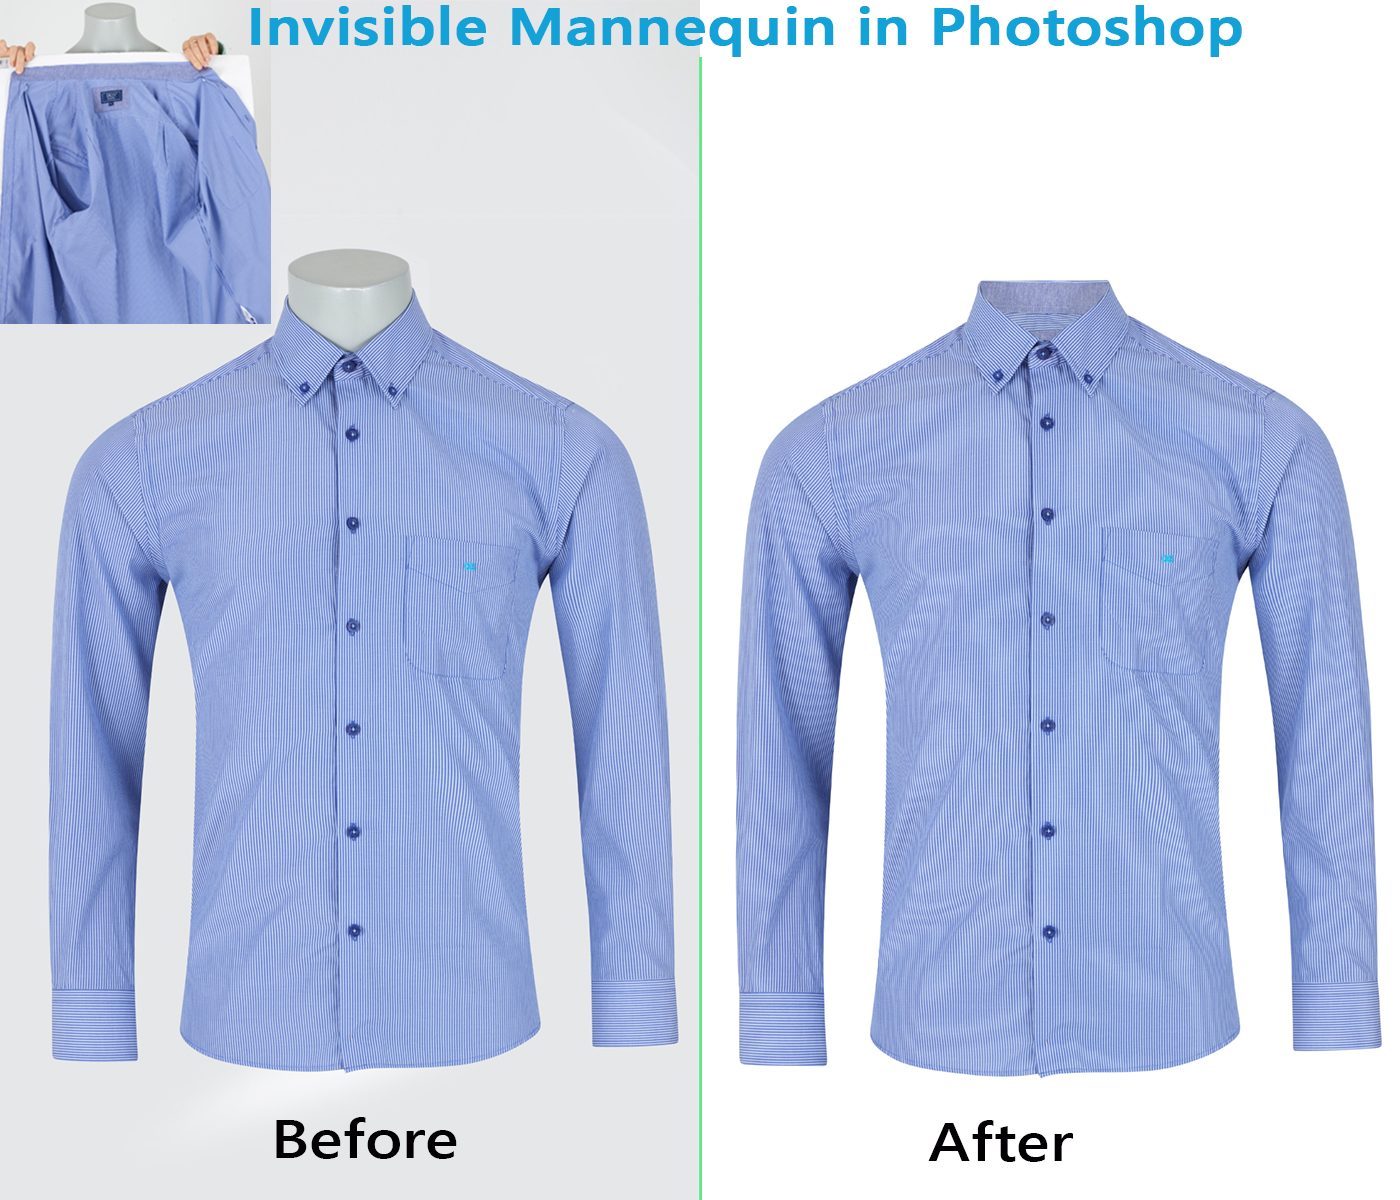
How to Make A Invisible Mannequin in Photoshop
In this fierce e-trade global, you have to show your product in a way, in order that clients turn out to be extremely joyful seeing your products. Utilizing an invisible mannequin in Photoshop on your product photos is a talented and financially savvy technique to decorate your online business. Invisible Mannequins allow your products to preserve their garb shape, which could make product images look greater professional and steady — in the end increasing their attraction to clients. So, ghost mannequin pictures effects or invisible ghost mannequins undergo excessive significance within side the present global of business.
What is invisible mannequin in photoshop?
The invisible mannequin that offers your products an attractive appearance. When you need to reveal each of your garment products’ front and interior elements, an invisible clothing mannequin is a sizeable impact to use. It is an invisible impact wherein the photo removes from the dummy and maintains the product image. It guarantees each product’s internal and outer elements that give the purchaser a higher visualization. Also, getting to know a way to make a ghost mannequin in Photoshop will assist you in instances in your business.
An invisible mannequin in photoshop impact offers a product measurement and indicates components of the product. which might, in any other case, be obscured via way of means of a mannequin or model in a single shot. In a nutshell, it’s a smooth manner to offer your e-commerce keep an expert contact and makes it plenty less difficult for ability clients to visualize products of their minds. In this article, I’m going to stroll you thru the method of putting in place your shoot, shooting the good photographs, and editing your pictures in Adobe Photoshop to supply the invisible mannequin effect.
By the cease of this weblog post, you’ll understand precisely a way to seize photographs that make it appear as even though your clothes are floating on an invisible body.
A form of Photoshop work for clothing-additionally called ghost mannequin, invisible mannequin, or hollow man. It is a unique way to image clothing without a model and is carried out in clothing photos to create a realistic appearance. Thus, online buyers can visualize how portions of the garment look or match in a body after wearing.
Now, the time comes to explain the process of creating the invisible mannequin impact the usage of Photoshop. Let’s undergo our ghost mannequin effect tutorial on the stairs below.
Step 1: Open your files and generate layers
First, you may want to open the mannequin photo and the froth board picture in Photoshop. Select your mannequin picture and create a brand new background layer. Fill that layer in with white; it’ll function as your usual background while you’re finished. It’s also useful to label your layers to inform them aside and stay organized. Now in this situation, if you need to do liquefy then you have to do that here. Go to the filter and choose Liquefy Photoshop. Also,you can press CTRL+SHIFT+X to do it as a shortcut.

Step 2: Using the selection tool to select the file in the image
Now it’s time to pick out the product on your mannequin image. Press W to get this tool by shortcut. Zoom in tight and choose your tool: quick selection, lasso, or magic wand. All 3 let you perform your preferred selection. Also for the clipping path you can use the pen tool. Most senior designers prefer the pen tool for clipping paths. Keep in mind that, in maximum cases, using a white background while taking pictures allows you to remove the mannequin without problems.

Step 3: Rectify and position your mask for Invisible Mannequin in Photoshop
Once you have selected the whole product, rectify your masks to be fine and tight, removing all the background and mannequin. This may be done using the Refine Edge tool from the Select menu. Click OK in the Refine Edge box and vicinity masks in your layer. At this point, you have to see your product floating freely in the white background which you created in the beginning. If necessary, refine the masks barely extra and/or refine the product’s edges to give it an excellent, smooth look. This is the more vital step for creating an invisible mannequin in Photoshop.

Step 4: Repeat the previous three steps for Invisible Mannequin in Photoshop
Now it’s time to replace tools and repeat Steps One, Two, and Three for the foam dummy photo. This form of product photo may also appear strange at first. However, having one to paint with is essential. Photographing the product interior-out will permit you to reveal the inside again of the dummy, finishing the invisible mannequin illusion. Create a brand new layer, choose out the product, and create and refine your mask. Press CTRL+SHIFT+N to create a layer in very less time.

Step 5: Attach shadows for Invisible Mannequin in Photoshop
Finally, upload a shadow among the two layers to present the product in a few depths. This step will make your invisible mannequin in Photoshop appear professional and realistic.

Step 6: carry away unnecessary portions of the layer
At this point, it’s a great concept to “hide” your mannequin layer and carry away unnecessary portions of the layer. In reality, you want to maintain that neckline triangle among the shoulders. It’s vital to bear in mind to dispose of that piece in the foam board photo because it’s already in the vicinity of the ghost mannequin shot. Once you’ve accomplished this, double-check that your layers are smooth and that not anything is out of alignment.

Step 7: Merge the layers of the image and save
When each picture comprises tight, clean masks, drag the masks from your foam board photo over to the image of your invisible mannequin image. Organize the layers so that the froth board photo is lower than the model photo. Then, alter the site of the froth board layer and adjust its proportions to suit the back of the mannequin layer flawlessly. Select all the layers and press the right button. A drop-down menu occurs. Select merge layers and click on this. Also, you can use CTRL+E to do it as a shortcut. save a duplicate of the Photoshop file with all the layers intact, simply to be safe. Once you’ve saved the layered file, flatten or merge all the layers collectively and save the photo like a one-of-a-kind file.

Conclusion
After following the above steps, you’ve found a way to make an invisible mannequin in Photoshop. Finally, your edited photos are equipped to show online.
The ghost mannequin effect is highly efficient for using the eye of customers if carried out correctly. You may also use this effect for advertising and marketing functions in your products online via social media or your website. In addition, the mannequin effect will assist you in pushing your income up because of the attractive appearance of your product. E-trade corporations for product retouching, Amazon, Alibaba, and eBay, use this impact to symbolize their products to their customers.
Getting it done utilizing an expert like Edit picture online, maybe another alternative you could hold in mind. We will do Invisible mannequin in Photoshop in a very cheap rate then others. After all, it’s far the best of the work that topics the most.