Remove Wrinkles From Clothes in Photos
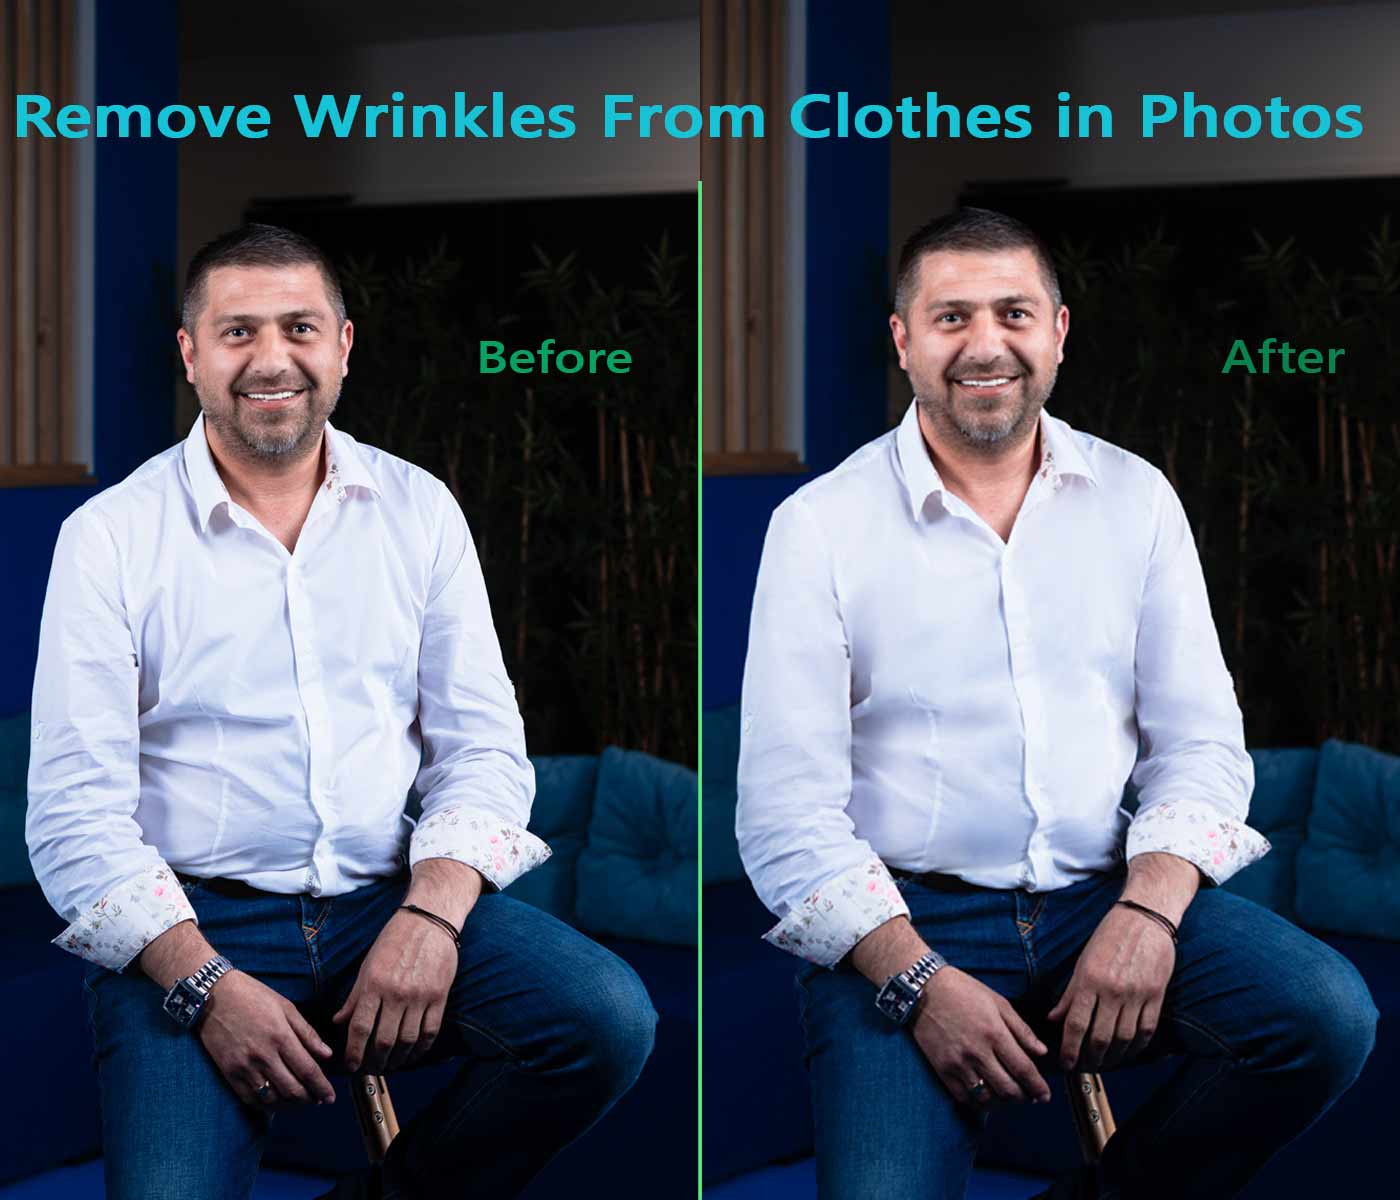
Remove wrinkles from clothes photos and make the clothing photo an outstanding view. Wrinkles ruin the appearance of clothing photos. So, remove wrinkles from clothes in Photoshop and drive your sales, which will help you to dominate the industry. Also, without eliminating wrinkles from the apparel, you cannot show your clothing products in the correct visualization to the customer. Having many creases in the clothing product also creates a barrier to viewing the fabrics and textures. It also damages the natural beauty of the photos. For this reason, the viewers can not get the natural visual feel of the product.
Table of Contents
ToggleBenefits of Remove Wrinkles From Clothes Photos
- Create professional view
- Improve appearance to the customers
- Great visualization
- Enhance the image quality
- Create buyers and visitors’ satisfaction
- Increase sales
- Maximize the profit
Removing wrinkles is not a tough job for the solid color clothing photographers, but if you want to remove wrinkles from clothes, textured and striped clothing images, it may be difficult for you. From the below discussion, we will know in detail about the wrinkle removing process. So, let’s jump to the magnetic part of this article.
How to Remove Wrinkles From Clothes in Photoshop?
There are many ways to remove wrinkles from clothes in Photoshop. So, you can use various types of photoshop tools for this. Here, you should be concerned about the professional and easiest ways. I am giving all types of Photoshop tools that are used to remove wrinkles from clothes below.
- Clone stamp tool
- Healing brush tool
- Content-Aware fill
- Dodge tool
- Burn tool
- Frequency Separation process
- Patch tool
- Copy and paste manually
All the mentioned tools are used to remove wrinkles from clothes photos. With perfect use of these tools, you can get the best results. All blog writers write blogs to show the easir tool like the Clone stamp tool, Healing brush tool, patch tool, or Content-Aware fill. So, these tools are very easy to use, and you will able to make one or two image spending 15-30 minutes. In this blog, I want to show the very uncommon and easiest two processes. One is Frequency Separation, and the other is the Dodge-burn process. So, let’s go and see how they work!
Frequency Separation Process
The frequency Separation technique is a professional way to remove wrinkles from clothes photos. It gives more incredible results to smooth wrinkles than the other process is a short time. Clone stamp tool, Healing brush tool, patch tool, or Content-Aware fill have many barriers like, the image may be blurred, or texture can be destroyed, but the frequency separation process has no barrier. Also, if you want to be a master retoucher, you must know this process perfectly. Let’s jump to the step-by-step process and learn it!
Step 1: Open the Image Having Wrinkles and Create a New Layer

Go to the file option for the Photoshop interface located at the upper left side. Then, two new layers will be created by pressing CTRL+J for Windows and COMND+J for Mac. After that, rename the layers as you want.
Step 2: Add blur

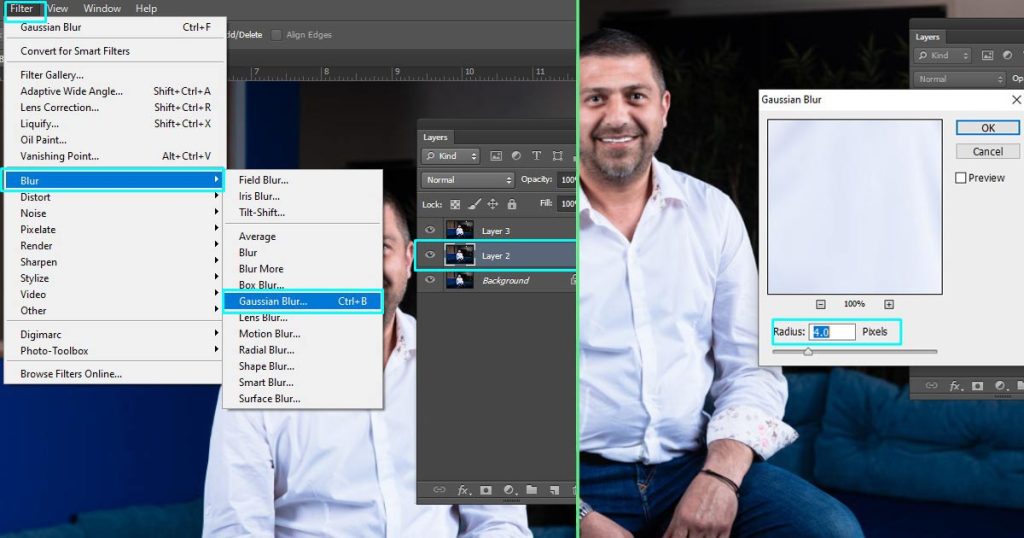
Select the middle layers from the layer panel from your remove wrinkles work panel. Then, go to the filter option from the photoshop interface. From the drop-down menu select the blur. So, you will get other drop-down menu options. Select Gaussian blur. Now, you will find the radius dialog box. Increase the radius as much you want. Then click OK button.
Workflow
- Select layer number two
- Go to the filter option
- Go to blur option
- Select Gaussian blur option
- Increase or reduce radius
- Click OK button
Step 3: Select The 3rd Layer

In remove wrinkles process, after completing the step no 2, select the 3rd layer. Then go to the image option from the upper side of Photoshop. From the menu, select the apply image option. You will get the ‘Apply image’ menu box. Select the 2nd layer on the layer menu. The channel must be RGB & blending will be ‘Subtract’. Scale and offset options need to be filled with 2 & 128.
Workflow
- Select layer number three
- Go to the image option
- Select apply image
- From the apply image dialog box, select layer number 2
- Select channel as RGB
- Select blending as Subtract
- Keep scale 2
- Offset keep 128
Step 4: Blending mode

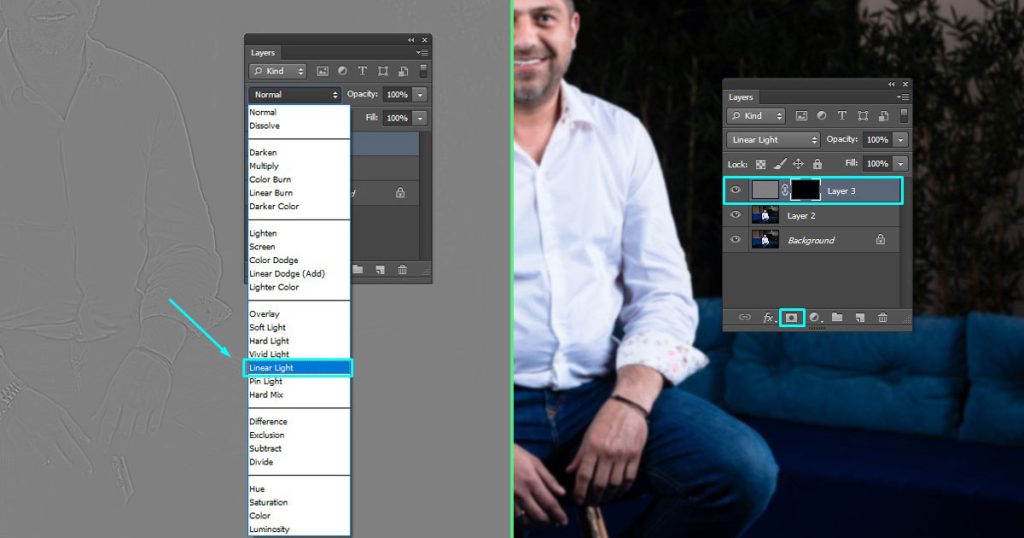
Please go to the blending mode and select linear light mode keeping selection on 3rd layer. After that inverse the mask.
Step 5: Select the Brush tool

When the step number four complete, go to the brush tool and select it. Keep hardness 30-40 and flow bellow 50%. Then brush the apparel photo, you will find that the wrinkles are smoothing. After completing brushing whole image, you will get the result. Finally, save the image as your desire format.
Dodge-burn Process
Do you like the fantastic things? What is an image? The images we usually see are the digital combination of lighting. Also, dodge-burn tools work with the lighting combinations. So, the burn tool is the performer to reduce light, and the dodge tool performs increasing light. To remove wrinkles from the clothing photo, the Dodge and Burn tool can be an alternative process of Frequency Separation. Let’s see how they work!
Step 1: Open A Image
After open the image in Photoshop and create a new layer, as you see in the previous process.
Step 2: Select Burn Tool

Burn tool can create shadow. Select the Burn tool and you can use it on the top of wrinkles to reduce lighting. Also, after using it you will see that the top of wrinkles has become smother. That’s means the lighting has been reduce and it is showing smoother.
Step 3: Select Dodge Tool

Dodge tool can increase light from your remove wrinkles. So, by selecting brushing on darker areas of wrinkles, you can increase the light. Then, you will notice that the darker part of the wrinkles seems to get brighter, and the wrinkles become smoother.
Step 4: Final touch up

Using dodge-burn tool perfectly you can make an image wrinkle free. Remember this, as much as you use these tools accurately, you will get the best result. Also, after completing, the process you can export the image as your desire format.
The Difference Between Remove Wrinkles and Photo Retouching
Photo retouch up is a vast thing but wrinkles removing is a part of photo retouching. All the retouching tools can be used different types of photo editing services. On the other hand, wrinkle removing service specially used in clothing photo retouching services. So, we can say that photo retouching and wrinkles removing are the very important part of photoshop services.
What Should We Pay to Remove Wrinkles From the Clothes Photo?
The price of any photo editing or retouching services depends on some terms and conditions like image quantity, image resolution, complexity etc. So, remove wrinkle are not a different thing. In edit picture online we usually charge 0.50$ for simple type of wrinkle remove. Then the price increases depending on photo complexity. Also, it can be up to 5$ per photo.
Final Words
Edit Picture Online provides wrinkle removal service at a lower price than the other companies in this industry. Also, there is no scope to think that we provide lower-quality remove wrinkles service. We believe in quality work, and it is our main goal.

