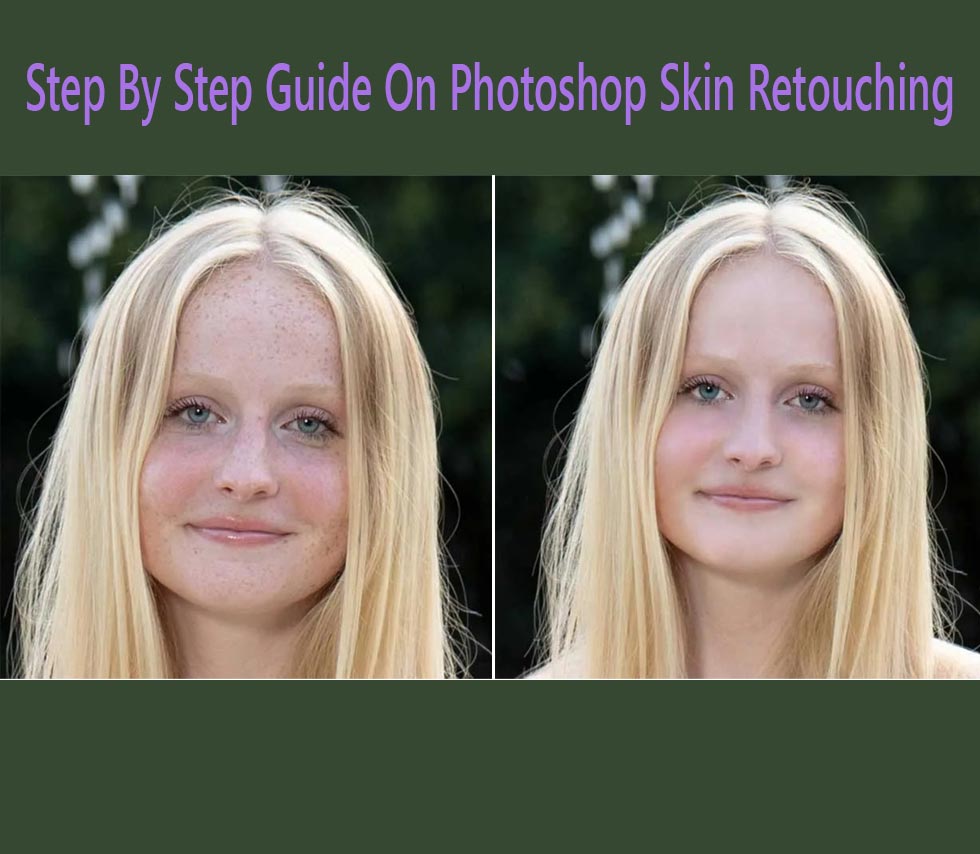
Step By Step Guide On Photoshop Skin Retouching
Keen to learn Photoshop skin retouching? You need to follow the guide step by step. Below we are explaining to you the whole Photoshop skin retouching process. It would offer smooth and clear skin on your model photographs. Whether you are a portrait or fashion photographer, the following tricks are always handy. With our in-depth tutorials, you get to clean up skin issues and make the skin look smoother by using blemish tool photoshop. Using these high-end skin retouching techniques, you could achieve professional model images with lesser effort. These would work for beauty skin retouching as well on your portrait photos.
As a photographer, you must make sure your model looks great at its best. But good photography skills won’t remove the skin issues that your model has. The easiest way to deal with these issues is to learn Photoshop skin retouching on your own. Afterwards, you could retouch the model skin to make it look good.
So, let’s start learning about these skin retouching processes.
Photoshop skin retouching With Remove Blemishes
You could remove blemishes photoshop from any portrait images a lot faster with Photoshop skin retouching techniques. Adobe Photoshop blemish removal provides you with the best results on your model face. The blemish removal photoshop process lets you clean up the face a lot faster.
It works most of the time and lets you get the best out of your model face. As the blemishes get away from your model face, the portrait photos look great all of the time. Using the skin blemishes removal technique, you could get the best result possible. Blemish remover Photoshop will help you to do that in a few step process as well.
How To Remove Pimple Scars/ Blemishes
If you have a question that how to remove blemishes in Photoshop, then you are in the right place. You could Photoshop remove pimples scars and blemishes out of your model image a lot smoother. With this high pass skin retouching you can get your desired model photo without pimples and blemishes. The Photoshop blemish touch up can let you achieve blemish-free model images.
If you get hold of the Photoshop blemishes removal process, it will help you a lot to fixing blemishes in Photoshop. There’s no doubt that Photoshop is the best blemish remover software you could ever find. The mentioning steps are a lot easier, and you could follow through on the go. The result of the process is precise and accurate. So, let’s get familiar with the process that how to take blemishes away in Photoshop.
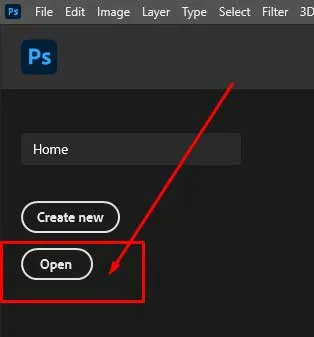
Step 1: Open Model Photography Images In Photoshop
To start the Photoshop Skin retouching or how to fix blemishes in Photoshop, open the photo that you have got during the model photoshoot. On Adobe Photoshop, just go into the File> Open and select the model image from your computer drive. It could take a bit of time, but the software would load the image on the interface. Once the image gets loaded into the Adobe Photoshop interface, you can start working on your image. Make sure you follow the mentioned steps one after another.
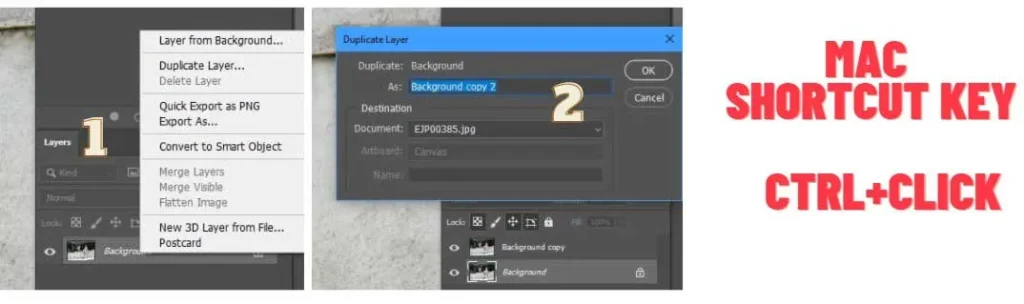
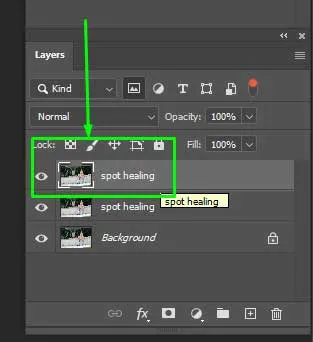
Step 2: Create New Layer In Photoshop
Now it’s time to create a new layer in Photoshop for skin retouching in Photoshop. You need to duplicate the background layer. To duplicate the layer, you could right-click on it and select the Duplicate Layer option. On the other hand, if you are on Mac, you could ctrl+click on the background layer to get the option to duplicate. On both platforms, you would get a fresh new layer on the Photoshop layer panel.
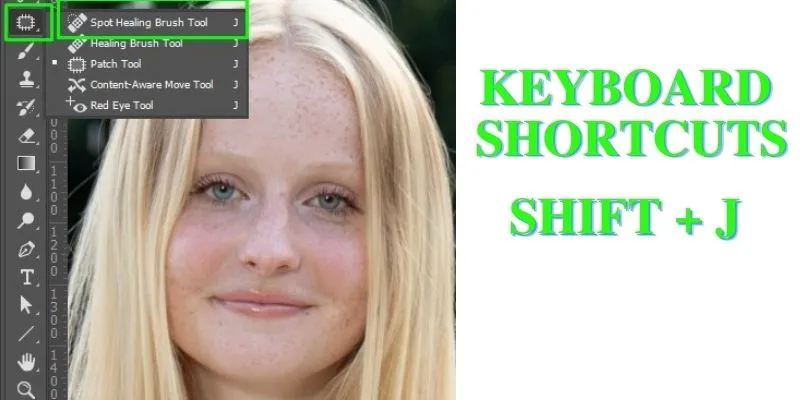
Step 3: Select The Spot Healing Brush From The Tools Panel
Once you get the new layer on Photoshop, you need to select the Spot Healing Brush tool from the Photoshop user interface. The spot healing brush tool is located in the toolbar section of Photoshop at the left which helps you to Photoshop remove blemishes from skin. Or you could use the shortcut Shift Key + J to get around all of the spot healing brush tools and others on the section.
Healing brush tool Photoshop is a great tool to let you fix blemishes and similar skin issues. Further, it provides you with customization on brush-width, modes, and others—more on it in the next section.
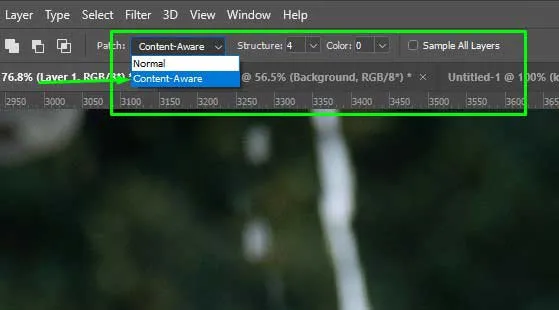
Step 4: Setup The Spot Healing Brush To Content-Aware Fill Photoshop
After you select the spot healing brush tool, you need to set it to content-aware fill. Alongside, you could customize the brush size with brackets “[“ + “]” to make the brush size bigger and smaller. It’s a lot simpler to customize the brush width and intensity.
Setting up the brush to content-aware fill would make Photoshop work just perfect. It lets you remove the blemish out of the face of your model a lot quicker. One thing to remember, you will get the “content-aware” option at the top bar after you choose the spot healing brush tool. It’s a must-do step on the following Photoshop skin retouching online tutorial.
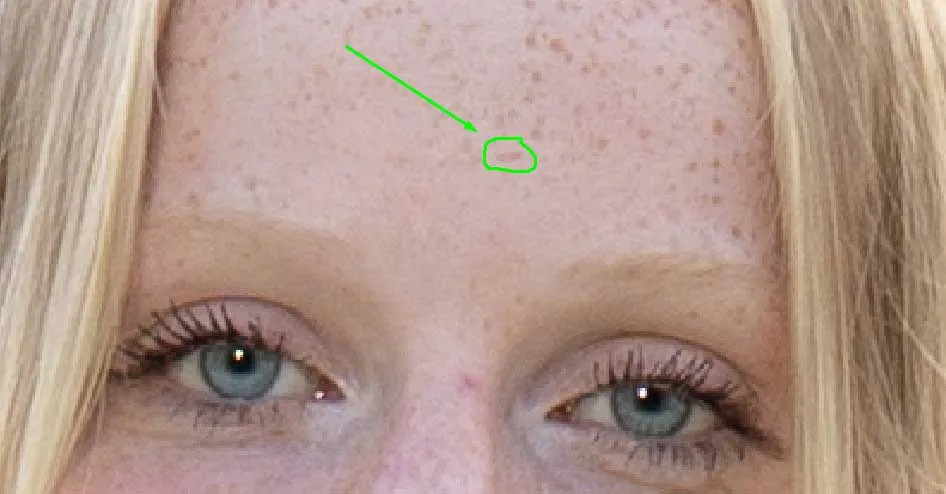
Step 5: Click on the skin to remove blemishes
Now zoom into the blemishes to fix blemishes photoshop, spots you want to remove out of your model photography. Make sure your brush size is a little bit bigger than the blemishes you want to remove. Once done, click on the blemish or pimple. The following Photoshop skin retouching technique works like a magic blemish remover. It would help if you kept on clicking on the blemishes you wanted to remove. Most of the time, Photoshop uses samples surrounding skin texture. Thus, it works only with one click. But if it still stays on, make the brush size bigger and keep on clicking. Nonetheless, the following process is helpful. Suppose you want to experience the best blemish remover process in Photoshop. In the end, you get a flawless model image with blemishes-free skin and blemish removal Photoshop is the reason for this.
Example: Remove Skin Pimples, Blemishes Using The Spot Healing Brush Tools
Right now, we will go over the actual process to remove skin pimples and blemishes. Using the spot healing brush tool, you could edit blemishes Photoshop or any skin issues like pimples within one or two clicks. So, let’s dig in.
Step 6: Click On The Spot Healing Brush Through The Pimples
Select the Spot healing brush tool on Adobe Photoshop to start removing skin blemishes or remove pimples Photoshop. It’s one of the great Photoshop skin retouching tools to use. Thus, check out the left tool panel, and you will detect a spot healing brush tool with a bandage icon. Or you could press shift key + “J” to get the brush tool right on your mouse cursor. It’s one of the best tools to get smooth skin and edit blemisheson Photoshop.
Step 7: Clicking To Heal The Pimples Or Blemish
Now adjust the brush size with “[” and “]” and make the brush a little bit bigger than the pimple. Once the brush size is enough to cover the pimple, press over it.
And Photoshop would analyse the surrounding area and use it to vanish the pimple. You only need one click to complete the task.

Step 8: Pressing The Spot Healing Brush Over The Second Blemish
Once you have completed working on the first pimple or blemish, it’s time for the second one. Go over the area where the skin blemish is located. Resize your Photoshop spot healing brush width. Now hover on the specific skin blemish and click on it. And it would vanish from the spot right away.

Step 9: The Second Pimple Or Blemish Is Gone?
Does the second pimple or blemishes vanish? If not, then you may have to click multiple times on the same blemishes. To avoid these types of scenarios, make sure you have enough brush size to cover the blemish or pimple.
Step 10: If You Erase The Pimples Is Not To Clean The Skin
One thing to remember during Photoshop skin retouching, you must only work on temporary skin issues. You should not edit other permanent face marks or scars because it may alter the original look of the model. Plus, it might make it challenging to recognise the model apart from the edited image. Make sure you keep these things in mind while working with skin blemishes.
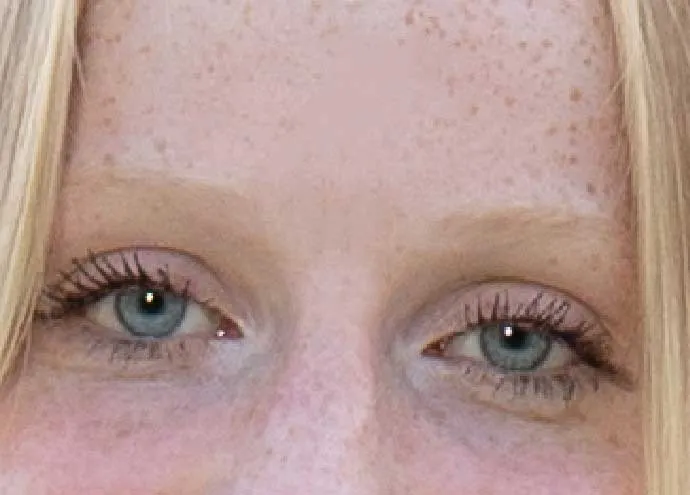
Step 11: The Final Image Of Remove Pimples And Scars
At the last moment, review the final image of the following retouching tutorial. If you still have any skin blemishes fix Photoshop to cover, do it before closing the File. Once you are done, save the photoshop image file with its changes. You could save the Photoshop file from adjusting the effects later. Here is the example of retouch up.
How to get smooth skin?
Getting rid of skin wrinkles and other imperfections is a lot more critical. Yet, getting out the perfectly smooth skin is not one click away. You need to follow a certain process to get smooth face skin. Moreover, if you want to get smooth body skin, you could follow the following Photoshop tutorial. But it might take a little bit of time to complete. So, follow the step-by-step process to understand the process of skin-smoothing in Photoshop.
The following process would let you keep the skin’s original texture and remove wrinkles and spots. It’s a bit advanced topic, though. You get the perfect result out of all. On the other hand, you could call it high-end Photoshop skin retouching as well. As a result, your model image looks far better than the reality. To achieve the level of perfection, we will use Photoshop remove skin imperfections, blur, and high pass filter tools one by one. So let’s get in.
Step 1: Create duplicate layer in photoshop
As in the previous process, you need a new layer on Photoshop to start working on. So, first, go into Adobe Photoshop and right-click on the background layer, and select “Duplicate layer.” On Mac, Ctrl+ click on the layer to get the same option. However, it’s the layer where you would add all of the Photoshop skin retouching effects.
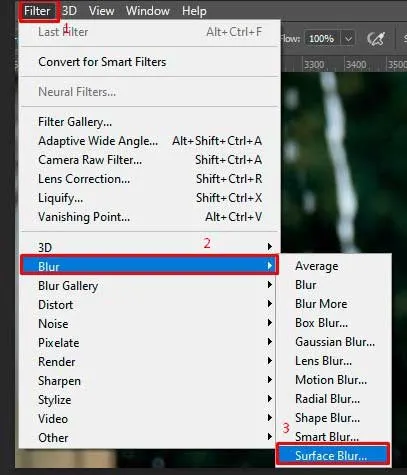
Step 2: Add Surface Blur In Adobe Photoshop
Now you could add the surface blur on Photoshop. To apply the blur effect, click on the Blur tool at the left of the Adobe Photoshop interface. Once you select the blurred image, adjust the radius and intensity as well. You could set the intensity anywhere between 80% to 100%.
Now apply the blur to the skin of your model. The following area will get a bit blurry and make the skin look smooth. You only need to blur the skin area of your model. For example, brush out the skin and face area to make it appear smoother.
Step 3: Apply Blur Skin To Skin
You need to apply the blur effect only to the skins. Don’t try to apply the affected areas outside of the skin. Otherwise, it would make other parts of the image blurry which would not look great. The blur effect would work on the rough skin textures and make it look smoother. This is why you must make sure the blur effects are only on the skin of your model. Thus, the following effect would let you get the perfect smoothness on your model skin. As a result, the whole composition works great. Limiting the blurriness to the skin would avoid further errors in the image.
Step 5: High Pass Filter
Want to get the best skin smoothing? Try out the following Photoshop skin retouching high pass filter technique. In the section below, we will go over the process. It’s a bit of a lengthy process, and you must follow all of the steps. The process is great to let you get the smoothest skin possible.
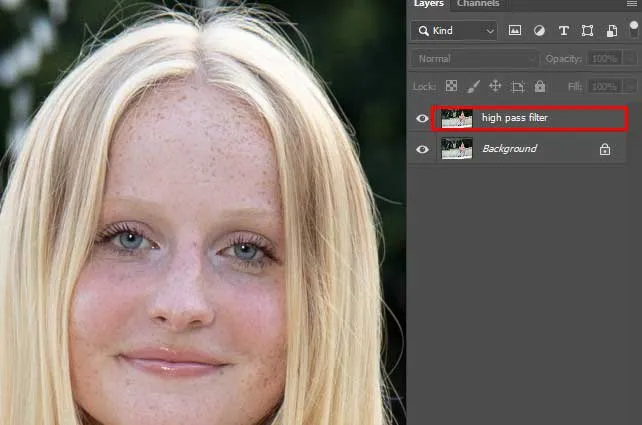
Step 6: Create a new layer to add a high pass filter
Create the new layer on which you will need to apply a high pass filter on. The fastest way could be, select the background layer and press Ctrl + “J” key on the keyboard. It would provide you with a new layer on the layer panel of Adobe Photoshop.
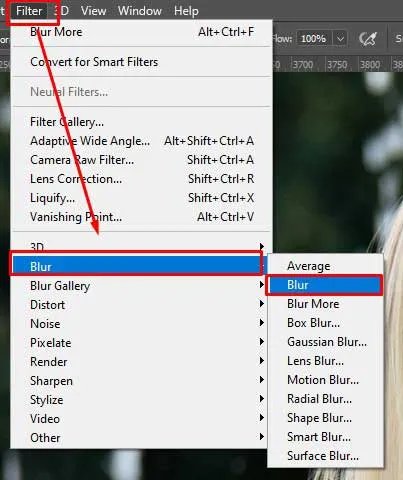
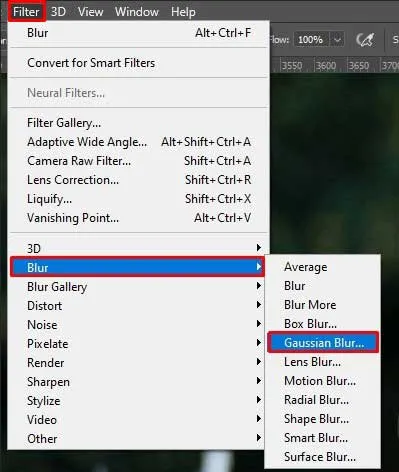
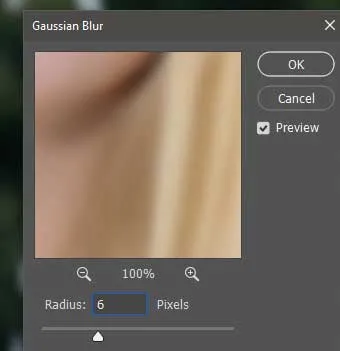
Step 7: Add gaussian blur in adobe photoshop.
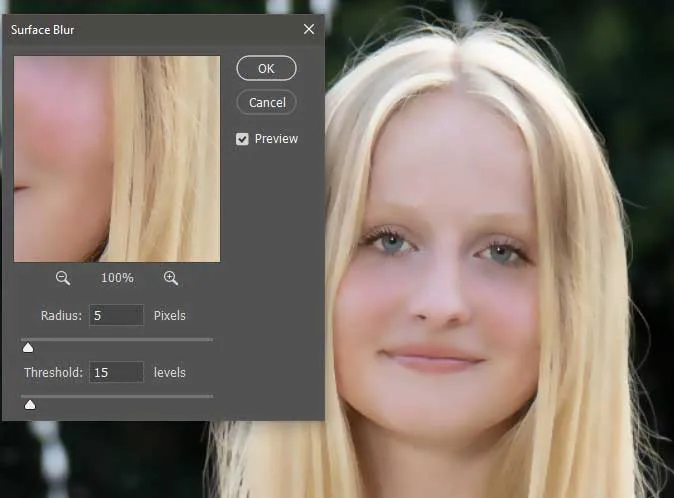
Now you need to activate the surface blur Photoshop feature on your model photograph. To do so, navigate into Filter > Blur > Gaussian Blur from the Photoshop top menu bar. Add 6 px as a blur value from the appearing window. Then click on the OK button. Afterwards, go to Filter > Others > High Pass, set the value to 23 Pixel, and click OK to confirm.
The surface blur would make the skin texture a bit smoother. It would help you to apply the next Photoshop skin retouching effects and make the skin smoother than before on the image.
Step 8: Apply surface blur to skin
You need to apply the blurriness only to the skin of your models on the photograph. To make it happen, we would use the below-mentioned process and techniques. It would restrict the blurriness effect only to the skin of your model. As we use layer masks, it’s an entirely non-destructive process to follow. Thus, you could go back and forth anytime you wish to go. So, you could save the File and come back later to make changes to the blur you have applied on the photographer’s model skin.
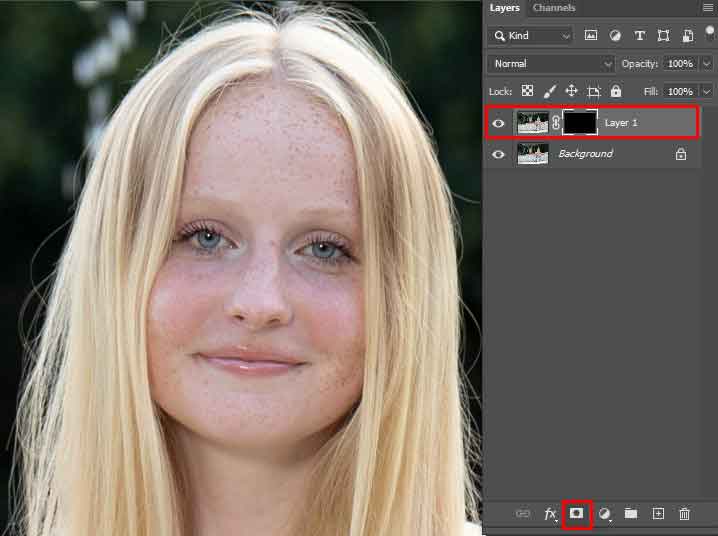
Step 9: Invert the layer
To create an inverted layer on Photoshop, Alt + click on the layer mask tool from the layers panel. It inverts the layer and lets you create a mask to restrict the blurriness to only skin. Plus, we will use a paintbrush to paint the blurriness effect only to the model skin.
Open the blending option
Now, we are going to open the blending option to make changes on the following layer. To open up the blending options on the layer, you only need to double-click on it. Then right-click on the same layer and select the “Blending Option” to apply further Photoshop skin retouching effects.
Afterwards, the blending dialogue box will open up, showing you all the options in one place. It gives you all the options to make further customization on the blending settings of the layer.
Drag The Blend If Sliders
On the blending mode dialogue customization box, you will get to see all of the options. Check out two sliders at the lower part of the appearing dialogue box. The first one is called the “Blend If” slider. You need to make changes on the “This Layer” slider to take effect on the image.
The following slider has a lot of importance on the blending moods. Both of the arrows control darker and lighter areas of the image you are working on. So you must alter the slider with proper attention to detail.
Reducing The Light Halos
Press Alt(Control in Mac) on the right arrow of the slider and drag it to the left. While pressing the Alt key in Photoshop, the other side of the slider doesn’t get affected at all. Don’t drag the arrows to the end. Place them with a little bit of distance to the opposite endpoint. However, performing the following task will reduce the light halos out of your image. To perform the following photoshop skin retouching task, attention and you will be good to go into the next step.
Reducing The Dark Halos to photoshop skin retouching
As with the right arrow of the slider, you have to do the same to the left side of the arrow. Simply Press Alt(Control in Mac) and press the arrow. While pressing the arrow, slide the arrow to the right side of the slider. It would reduce all the dark halos out of your image. Once you have completed sliding these arrows, Press the OK button to save the changes.

Add A Layer Mask
Now you need to add a layer mask to your image. It would help you to restrict the smoothing effect only to the skin of your photograph’s model. To do so, you need to press Alt(Control in Mac) and click on the “Add Layer Mask” button from the layers panel.

Select the brush tools
Afterwards, you need to use the brush tool in Photoshop to customize the new layer mask effect. You could spot the brush tool on the Photoshop left tool panel. Or you could press the “B” key from the keyboard as a shortcut.

Set up brush tools to white
Select the foreground colour of the brush to pure white. You could check the foreground colour at the colour swatch located at the bottom of the left toolbar. In case you want to reset the swatch colours, press the shortcut “D” to shuffle and reset the colours. You could double-click and manually select the white colour as your foreground colour. Once you have set the foreground colour, follow the below-mentioned steps.

Painting To Reveal The Smooth Skin
Now you have to brush on the skin of your photograph’s model. One thing to remember, as we are working on the layer mask, you won’t get the brush colour. Instead, your brushed areas would reveal the skin-softening effects only. Below we will go over the Photoshop skin retouching process to reveal the smooth skin.
Bringing back the smooth skin
First off, make sure your brush setting is set to Normal mood before you start your process. Adjust the brush size with “[” and “]” as well. Then, start brushing over the face of your model to reveal the smooth skin filter. Brush with proper attention as you have only to apply the effect to the model’s skin.
Visit: Old Photo Restoration
Revealing more of the smoothing effect
After you brush on the more accessible part, now let’s go into the more tricky parts. First, customize your brush size. Now apply smoothing effects to places like under the nose, around the eyes, ear, and you name it.
Note: You could revert the excess brushing effect by pressing “X” and brushing over the area. You could go back to the normal brushing mode.
Revealing the smooth skin in the lower areas of her face
At last, brush the lower area of the face of your photography model. You could brush the lower area of the face with a bit smaller brush width. Don’t forget to undo excessive brushed areas with the trick mentioned above.
Viewing The Layer Mask
Want to view the spots you have painted the smooth skin effect? Check out the following process. You need to press Alt and click on the layer mask thumbnail(with black and white colour). It would make the brushed areas visible with white colour. The black colour represents the areas where you haven’t applied the smooth skin effect.
Press Alt and click on the same layer mask thumbnail on the layer panel to go back to the normal view. And everything would be the same as before. Feel free to adjust the masking effect if you still feel incomplete.

Conclusion
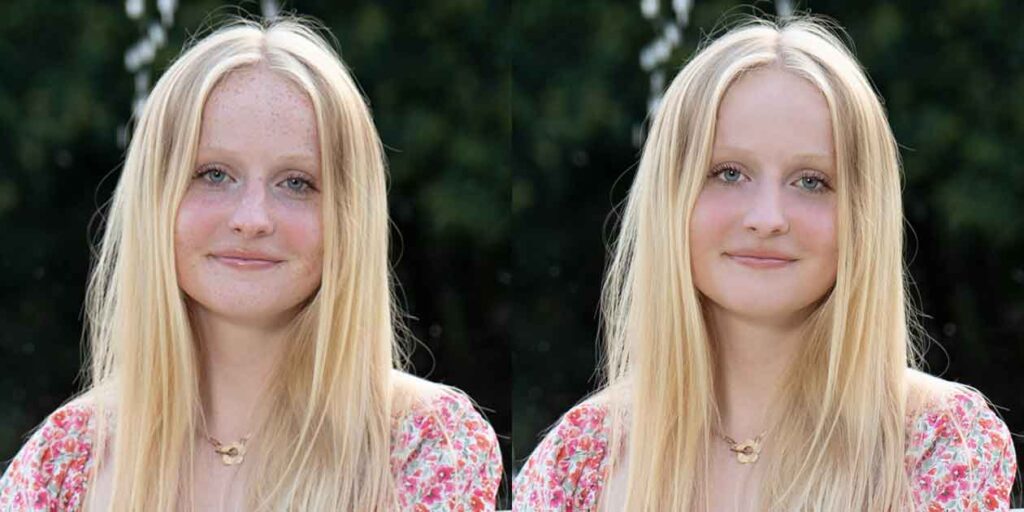
Photoshop skin retouching is a very vital task to get professional model photographs. Your model might have pimple blemishes or other temporary skin issues. With the proper skin retouching process, you could make your model skin look perfect. Further, you have the option to apply skin smoothening effects as well.